Channel Masking in Photoshop: Benefits, How-to and more
Getting a precise selection in Photoshop can really be frustrating at times. If you have ever felt that, trust me, you are not alone.
Creating selection is one of the most important parts of professional image editing.
There are various ways through which selections are created. Each, with its own strengths and weaknesses.
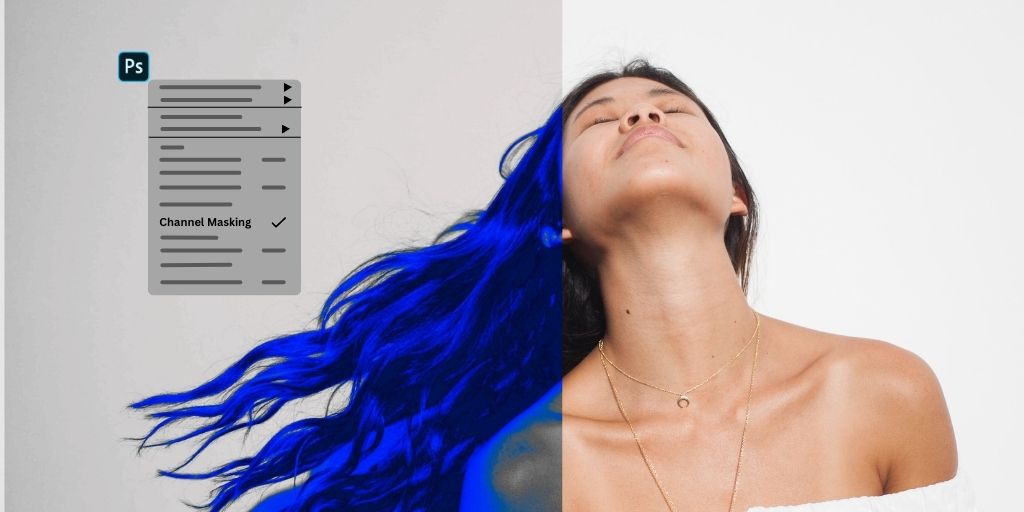
Channel masking is one such Photoshop technique that you can use to create a precise selection of objects with fur, hair, or similar uneven subject.
It creates selections based on luminosity and contrast, giving you greater control over the selection process.
In this article, we’ll take a deep dive into channel masking and explore how it can help take your Photoshop skills to the next level.
We’ll cover all the benefits of channel masking and provide a step-by-step guide to help you get started. Without taking much of your time, let’s get started.
What is Channel Masking in Photoshop?
Channel masking is a Photoshop technique that helps retouchers create complex selections of an image using the channels panel.
Channels are black and white versions of the different colour channels in an image. Using these channels, retouchers create precise selections of the image based on the luminosity or contrast of the pixels.
This is really helpful for images with difficult edges, hair, or transparent elements. Due to such uneven surfaces, the selection from the clipping path might not deliver the best results as it creates unrealistic selections.
Channel masking is particularly useful for advanced image compositing and retouching. It creates precise selections and makes the image look more realistic when the cut-out has been created.
How to Create Channel Masking Selection in Photoshop?
Following this step, you can create a channel mask selection in Photoshop:
- Open the image you want to work on in Photoshop, and open the Channels panel. You can access the Channels panel by going to the Window menu and selecting “Channels”.
- In the Channels panel, select the channel that has the most contrast between the object you want to select and its background. This is usually the channel with the highest contrast, such as the Blue channel for a blue sky or the Red channel for a red object.
- Duplicate the selected channel by right-clicking on it and selecting “Duplicate Channel”. Rename the duplicated channel to something like “Selection” so you can keep track of it.
- Use the Levels or Curves adjustment to increase the contrast of the duplicated channel. This will help refine the selection further. You can adjust the levels by going to the Image menu, selecting “Adjustments”, and then selecting “Levels” or “Curves”.
- Once you have the selection you want, hold down the Command key on a Mac or the Ctrl key on a Windows and click on the duplicated channel. This will create a selection based on the channel mask.
- Use the selection to modify the image. You can adjust the color, contrast, or other elements of the image using the selection.
- Once you’re done with the selection, you can deselect it by pressing Command+D on a Mac or Ctrl+D on Windows.
Keep in mind that channel masking is a powerful technique that takes practice to master.
With some experimentation and practice, you can use channel masking to make precise selections in Photoshop that can help take your images to the next level.
Benefits of using Channel masking for selection

There are several benefits to using channel masking for selection in Photoshop. Here are a few:
Precise selection
Channel masking allows you to make precise selections of an image based on luminosity or contrast, which can be particularly useful for selecting objects with difficult edges, such as hair or fur.
Time-saving
Channel masking can save time when compared to other selection methods in Photoshop. Using the channels panel to make a selection can be faster than manually selecting an object using the Lasso tool or the Magic Wand tool.
Refinement
Channel masking allows you to refine your selection by adjusting the contrast and luminosity of the channel, giving you more control over the selection process.
Flexibility
Channel masking provides flexibility in terms of how you use the selection. You can use the selection to make adjustments to the image, or you can use it as a layer mask to combine different images or create a composite image.
Compatibility
Channel masking is compatible with other Photoshop tools, such as adjustment layers and blending modes. This means you can make complex selections and combine them with other tools to create unique and dynamic images.
Channel Masking Vs Clipping Path
Clipping Path Pros & Cons
| Clipping Path Pros | Clipping Path Cons |
| Simple and easy to use | Can be time-consuming for selecting complex objects |
| Ideal for selecting objects with clean and well-defined edges, such as geometric shapes | Not effective for selecting objects with soft or blurry edges, such as hair or fur |
| Can be used to create vector paths that can be resized without losing quality | Requires manual adjustments for objects with multiple colors or gradients |
Channel Masking Pros & Cons
| Channel Masking Pros | Channel Masking Cons |
| Can make more precise selections based on luminosity or contrast, ideal for selecting objects with difficult edges such as hair or fur | Can be more complex and time-consuming than clipping path for beginners |
| Provides greater control and flexibility in refining the selection with adjustments | Requires practice to master and get the most out of the technique |
| Can be used for advanced image compositing and retouching, as well as artistic effects | Not ideal for selecting objects with clean and well-defined edges, such as geometric shapes |
Conclusion
Channel masking in Photoshop provides a precise and flexible way to make selections, saving time and giving greater control over the selection process.
It is a valuable tool for advanced image compositing and retouching, as well as artistic effects such as high-contrast images or abstract art.
By mastering channel masking, you can take your Photoshop skills to the next level and create stunning images that stand out.
Looking to get the perfect selection and get your eCommerce images edited by professionals?
PixelPhant is a professional photo editing service, working with the fastest growing eCommerce brands across the globe. We provide professional services like high-end retouching, shadow adding, Channel masking and clipping path service, as well as other post-production service. Get started with our professional photo editing service with a free trial as per your specifications and turnaround time.