Bottle Photography: Photograph Bottle Products For eCommerce
Learning bottle photography is tricky. You have to balance lighting, reflection, angle, camera settings and every other photography element.
But with all said and done, you are going to enjoy the process of getting started.
It can be for a client or experimenting for yourself. We are sharing How to get started with Bottle Photography.
If you are capturing products like water bottles, wine or beer bottles, perfume bottles, a bottle of sauce, milk bottles, etc.
Without taking any more time, let us begin with this guide to photographing bottle products for eCommerce.
Bottle Photography Equipment
The list of bottle photography equipment is fairly simple and regular for a product photographer. Here is everything that you’ll need:
- Table
- Tripod
- Black cards
- DSLR Camera
- Strobe lighting
- Softbox lighting
- Polarizing Gel
- Background cloth/paper
- White paper sheet (reflectors)
This is a list of basic bottle photography equipment for eCommerce product photography. With this equipment, you’ll be able to photograph bottles on a plain background that is well-lit from all sides and details visible.
You can even add some props once you start to understand the process, but if you are a beginner, it is better to learn basic product photography setup first.
Bottle Photography Setup
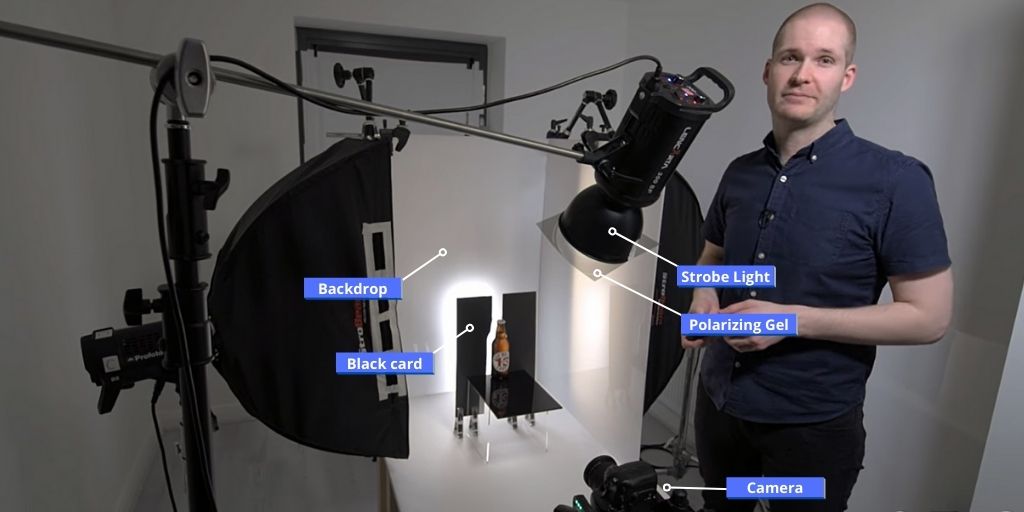
Setting up your studio might be overwhelming at the start, but as we go along you’ll learn why we are using and setting up the photography equipment the way we are.
Before that, we have to have a common understanding of the product. That is when we are capturing bottles, most of the time they will have a reflective surface. The goal of product photography is to capture a clean and clear photograph with all details and sides of the bottle visible.
To get that, let us set up our bottle photography equipment.
1. With the help of background cloth or paper, create a seamless background and base for your product.
2. Place the softbox light behind the background cloth to get the light from the background.
3. On the right-hand side place the white paper sheet that we will use as a reflector from the other side
4. On the front left side will be the main light which is our strobe light with the polarizing gel.
5. Now the DSLR camera will be placed right in front of the bottle fixed on the tripod.
We will place the black cards near the bottle at a 45 degree angle to have a clear outline of the bottle with shadow and lighting.
Bottle Photography Lighting
We have already discussed the lighting setup above. And here we are just discussing the role of various lights that you’ll be using.
Softbox
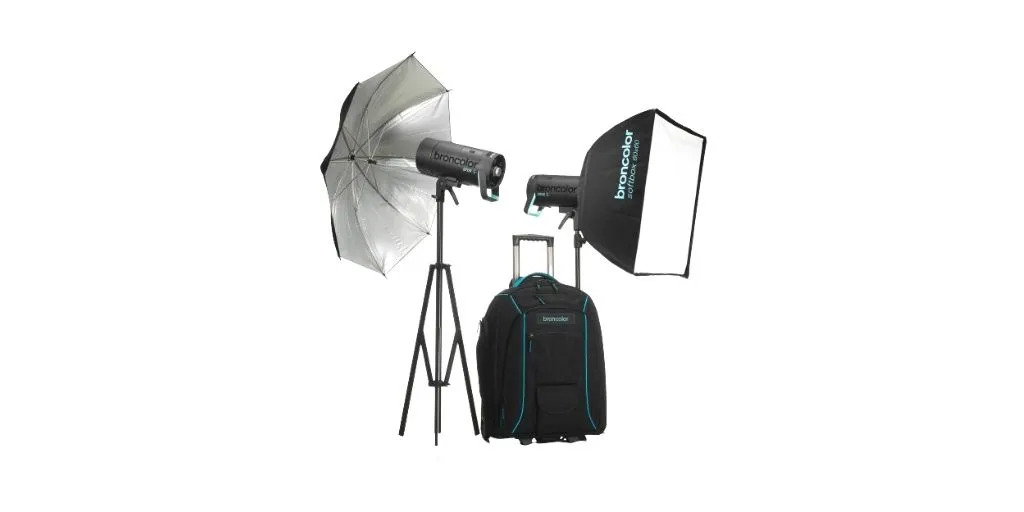
It is at the back of your background cloth/paper that will be putting light through the bottle and help you get clear boundaries without reflections. The closer the light is to the backdrop, the harder the light will be.
So it is recommended to keep the light slightly away from the backdrop so that there is a good spread of light. And when the light passes through the cloth with the bottle in front, you’ll be able to capture it perfectly.
Strobe Light
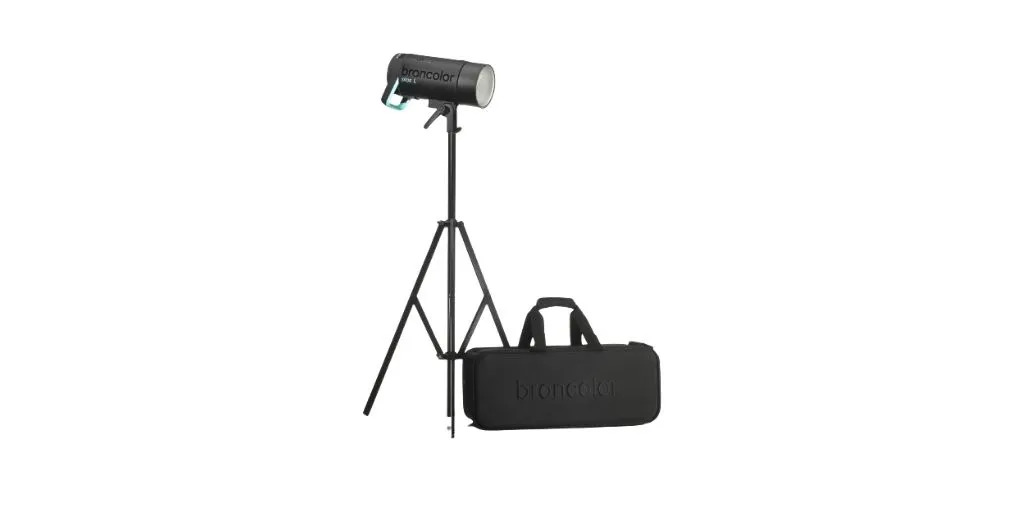
The strobe is on the front left side of the table where the bottle is placed. From the top, it illuminates the front side of the bottle.
But if you capture it right away, you will see its reflection on the bottle. For that, we use a polarizing gel sheet on the light.
This will help you get light but help you avoid the reflection that is caused due to direct lighting on the bottle.
Reflectors
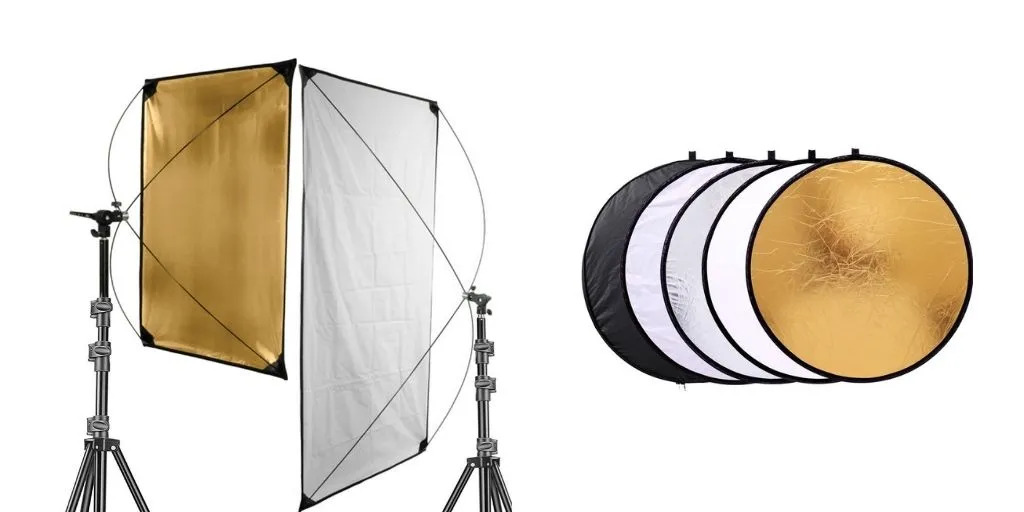
On the right side, we are using a white sheet as a reflector to fill in the length from another side of the product. This is done to make sure that during the bottle photography the details are clearly and easily visible.
How to photograph a bottle?
Now that all the setup is ready for bottle photography, all we have to do is photograph the bottled product.
1. Place the bottle in front of the camera on the table. Make sure that the camera is well aligned and that there is some negative space around the bottle in the frame.
2. Now, use the black cards and place them on either side of the bottle. This will create a slight shadow on the side of the bottle, giving it much more definition.
3. Turn on the softbox and get a trial shot. Here make sure that your softbox isn’t creating hard light on the bottle. If so, move the softbox slightly away from the background.
4. Now turn on your strode light and connect it with your camera. Adjust it and take a trial shot. If you see the hard reflection on the bottle, you shall use polarizing gel on the light and try again.
5. Take a close shot of the bottle in a way that the whole bottle is visible along with some negative space so that it is easy to create a cutout and change the background during post-production.
Do’s & Don’t of Bottle Photography
As a photographer, you have the creative liberty to get the best shoot. However, you may see fit. That being said, one needs
Dos
1. Use a Clean Background: A simple, uncluttered background will allow the bottle to stand out. Consider using a solid color backdrop or a neutral surface.
2. Lighting is Key: Good lighting is crucial for bottle photography. Soft, diffused lighting works best to minimize harsh reflections and highlight the shape and texture of the bottle.
3. Experiment with Angles: Try shooting the bottle from different angles to find the most flattering perspective. This can help emphasize the shape and design of the bottle.
4. Highlight Unique Features: If the bottle has any unique features or details, make sure to highlight them in your photographs. This could include interesting labels, textures, or shapes.
5. Use Props Sparingly: While props can add visual interest to your photos, be careful not to overwhelm the main subject. Keep props simple and complementary to the bottle.
6. Consider Composition: Pay attention to composition principles such as the rule of thirds, leading lines, and symmetry. These can help create visually appealing images.
7. Shoot in RAW: If possible, shoot in RAW format to give yourself more flexibility during post-processing. RAW files retain more information than JPEGs, allowing for greater adjustment of exposure, color, and contrast.
8. Edit Thoughtfully: Post-processing can enhance your images, but be careful not to overdo it. Adjustments such as exposure, contrast, and color balance can help fine-tune your photos without sacrificing their natural appearance.
Don’ts
1. Avoid Harsh Lighting: Harsh, direct lighting can create unflattering reflections and hot spots on the bottle. Opt for soft, diffused lighting instead.
2. Don’t Overlook Reflections: Pay attention to reflections when positioning your lights and camera. Reflective surfaces such as glass can easily pick up unwanted reflections from surrounding objects.
3. Don’t Forget about Cleanliness: Make sure the bottle is clean and free of smudges, fingerprints, and dust before photographing it. Even minor imperfections can be distracting in close-up shots.
4. Avoid Busy Backgrounds: Busy or cluttered backgrounds can detract from the main subject. Keep the background simple and unobtrusive to draw attention to the bottle.
5. Don’t Oversaturate Colors: While it’s tempting to enhance colors in post-processing, be careful not to oversaturate them. Aim for natural-looking colors that accurately represent the bottle.
6. Avoid Cropping Too Tightly: Leave some breathing room around the bottle when composing your shots. Cropping too tightly can make the image feel cramped and claustrophobic.
7. Don’t Ignore White Balance: Pay attention to white balance settings to ensure accurate color reproduction. Different light sources can have varying color temperatures, so adjust the white balance accordingly.
8. Don’t Rely Solely on Auto Mode: While auto mode can be convenient, it doesn’t always produce the best results. Experiment with manual camera settings to achieve more control over exposure, focus, and depth of field.
Bottle Photo Editing
Now that you are done with bottle photography it is time to get your images edited. Because of your professional bottle photography 50% of the work is done and now comes the other 50%.
At this stage, create a clean and precise cut out of the product using professional tools like a clipping path or even a magic wand.
It’s time to adjust the setting of the image like the exposure, saturation, highlights, shadows, etc. Also, ensure that there are no unwanted scratches, water droplets, fingerprints, etc on the bottle.
Now that the image is ready, we can either use it without a background in .png formate or put it on a background of the choice. Mostly eCommerce bottle photography uses a solid color background to display the bottle.
Bonus Read
After getting done with the bottle photography and capturing all the other eCommerce photography, editing them can be time-consuming. Especially when you are dealing with hundreds of products a day.
But rather than diverting your resourceful time into editing the image, you can outsource them. This will help you save time, but when you outsource your eCommerce images, you also get assistance from photo editing experts.
PixelPhant is a leading eCommerce photo editing service with a team of highly trained experts who will make sure your images look professional, descriptive, eye-pleasing, and perfect for your eCommerce. Got a product image? Get a free image editing trial now ?.